This is by far the absolute easiest way I’ve found to chop samples, and I wanted to pass along my quick 5-minute step-by-step tutorial on how to sample in Ableton Live 9.
How to Sample in Ableton Live 9
It’s been some time since I’ve covered this topic on sampling, so today’s video is a revamp on the How To Chop Samples in Ableton Live 8 tutorial video I shot a number of years ago – only this time demonstrating in Ableton Live 9.
First off, let me say that there are a number of ways you can sample in Ableton Live – this is simply the method I’ve found that works best for me and seems to be the most straight forward.
This is part one of a multi-part Ableton Live 9 sampling series, and the intention for this first video is to get right into the meat and potatoes on how you can chop your samples and get your hands dirty right away.
In the follow-up videos I’ll be covering more advanced sampling features and functionality to build on what we cover here today in this quick tutorial.
Let’s Get Started
The first thing we want to do to get started chopping our sample in Live is to drag our audio sample (.mp3, .wav, .aiff, etc) into an empty audio track.
Note: Don’t worry too much about what your current global tempo is set at, this won’t affect our process.
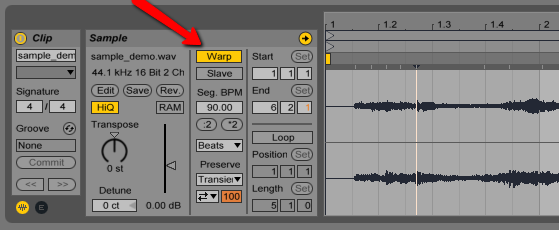
By default, when you drag over a new audio file, Ableton will automatically enable the warp engine and may try to time stretch or alter your sample depending on its current BPM. That’s no problem, though. All we need to do is click the “Warp” button. This will clear all existing audio warping and restore the sample to its original speed and sound.
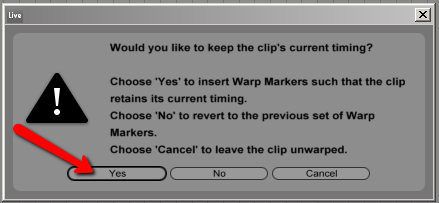
Once you’ve got the warping cleared, you’ll want to click “Warp” again to re-enable the warp engine and click “Yes” to keep the clip’s current timing.
Slicing the Sample
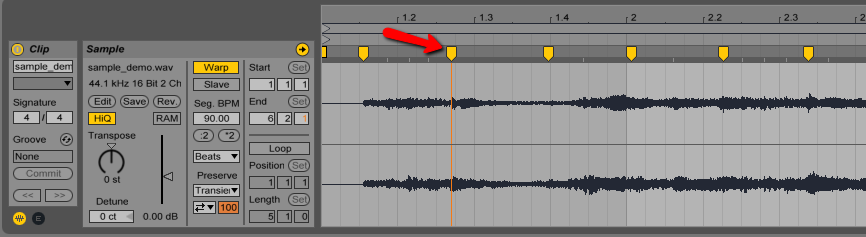
So as you may or may not have already imagined, we’re actually going to be using Ableton’s warp markers to pick the exact places where we want to chop up our sample.
Note: The warp markers and warp engine are traditionally used for warping, or time-stretching your audio sample. But in this sampling method, we’re only using the warp markers as the starting places for the sample slices. In other words, each of the warp markers will end up creating a new sample chop, but will not retain any of the audio warping.
And so to pick our sample points, we simply “Double Click” on the segment of the audio we want to place a new warp marker.
Now once you have your warp markers in place, all you have to to is “Right Click” on the sample in the audio track, and click “Slice to New MIDI track”.
Note: If you are not using a full version of Ableton Live 9 (maybe you only have a demo or Lite version?) you may not have access to this slicing feature.

How to sample in Ableton Live 9
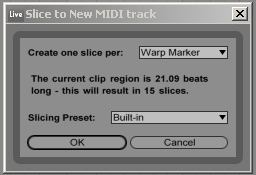
Once you click this option, you’ll have to option to pick your slicing preset as well as how you would like to slice the sample.
For this tutorial, we’re going to use the following settings:
Slicing Preset: “Built In”
Create one slice per: “Warp Marker”
Note: If you’re looking for an even quicker and more automated way to chop your samples, you may explore the “Transient”, “Bar”, “1/2 Note”, “1/4 Note”… settings as well.
New MIDI Track (Your Sample Chops)
Once you click OK, Ableton will create a new MIDI track with a drum rack containing your sliced samples. Using any properly configured MIDI controller, you should now be able to trigger your newly chopped samples.
Note: I recommend deleting the auto-generated MIDI sequence that Ableton includes by default. This is where you’ll want to get creative and make your own MIDI sequence.

And so that’s pretty much the basics as far as how to sample in Ableton Live 9. In the next ideos, I’ll be demonstrating some more advanced sampling features building off of what we’ve covered in this article.
Let’s Connect!
Did you find this video helpful? DON’T FORGET TO LIKE, COMMENT & SHARE 🙂
I’m very reachable on the following: Official Website | YouTube | Facebook | Twitter | Soundcloud | Instagram
About the Author
Travis Cole has been operating TCustomz Productionz, LLC full-time since 2011 and hopes for it to serve as a source to help many music artists, producers and entrepreneurs worldwide achieve their dreams of success.
Comments (0)